Furka Pass – 2,431m

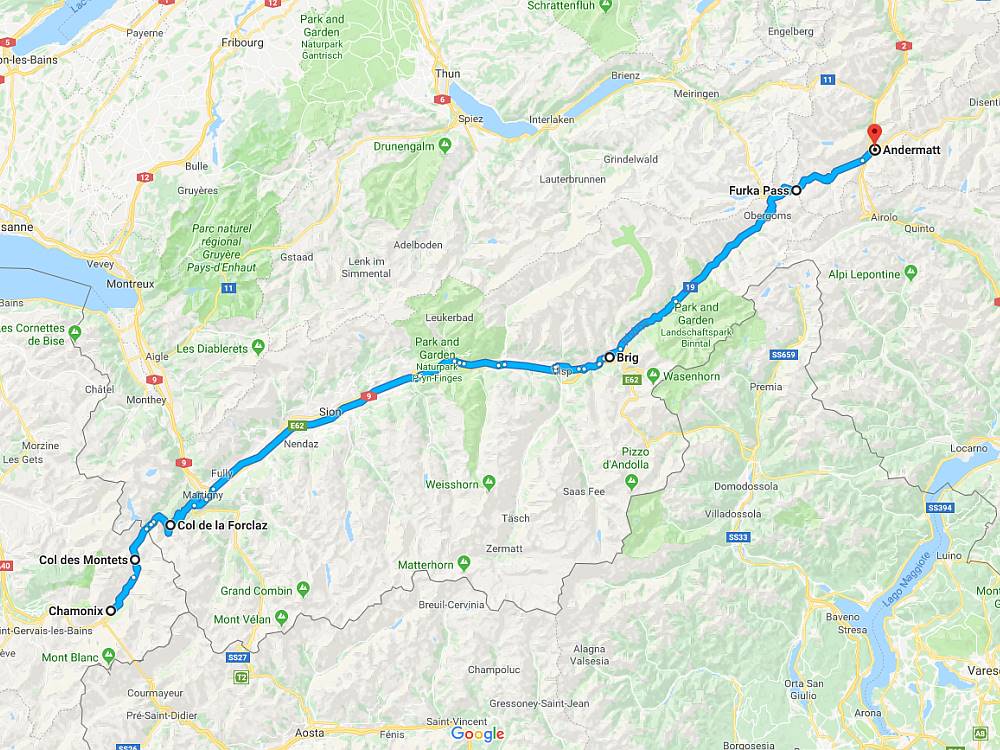
Location: Route 19 Andermatt to Gletsch (19 miles)

Coordinates: 46.57241,8.414864

Ridden: 2006 & 2009

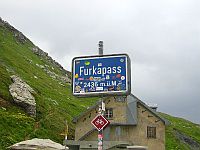
Immortalised by the Aston Martin DB5 chase scene from James Bond’s Goldfinger, the Furka connects Andermatt with Gletsch at the foot of the Grimsel Pass.

The western ramp is a little over 10 miles long and is wide and well surfaced. It takes you past the Rhone Glacier – the source of the River Rhone – where you can even enter an ice tunnel and go into the glacier itself.

The eastern ramp from Andermatt is tighter and steeper. In 2006 when we first rode the Furka this side wasn’t particularly well surfaced. However, since then there have been significant improvements, both to the surface and the engineering of some of the bends. Much improved and very enjoyable to ride.

eyJtYXBfb3B0aW9ucyI6eyJjZW50ZXJfbGF0IjoiNDYuNTcyNDEiLCJjZW50ZXJfbG5nIjoiOC40MTQ4NjQiLCJ6b29tIjo1LCJtYXBfdHlwZV9pZCI6IlJPQURNQVAiLCJmaXRfYm91bmRzIjpmYWxzZSwiZHJhZ2dhYmxlIjp0cnVlLCJzY3JvbGxfd2hlZWwiOnRydWUsImRpc3BsYXlfNDVfaW1hZ2VyeSI6IiIsIm1hcmtlcl9kZWZhdWx0X2ljb24iOiJodHRwczpcL1wvd3d3LmJib3QuY28udWtcL3dwLWNvbnRlbnRcL3BsdWdpbnNcL3dwLWdvb2dsZS1tYXAtcGx1Z2luXC9hc3NldHNcL2ltYWdlc1wvZGVmYXVsdF9tYXJrZXIucG5nIiwiaW5mb3dpbmRvd19zZXR0aW5nIjoiIiwiaW5mb3dpbmRvd19ib3VuY2VfYW5pbWF0aW9uIjoiIiwiaW5mb3dpbmRvd19kcm9wX2FuaW1hdGlvbiI6ZmFsc2UsImNsb3NlX2luZm93aW5kb3dfb25fbWFwX2NsaWNrIjpmYWxzZSwiaW5mb3dpbmRvd19za2luIjoiIiwiZGVmYXVsdF9pbmZvd2luZG93X29wZW4iOmZhbHNlLCJpbmZvd2luZG93X29wZW5fZXZlbnQiOiJjbGljayIsImZ1bGxfc2NyZWVuX2NvbnRyb2wiOnRydWUsInNlYXJjaF9jb250cm9sIjp0cnVlLCJ6b29tX2NvbnRyb2wiOnRydWUsIm1hcF90eXBlX2NvbnRyb2wiOnRydWUsInN0cmVldF92aWV3X2NvbnRyb2wiOnRydWUsImZ1bGxfc2NyZWVuX2NvbnRyb2xfcG9zaXRpb24iOiJUT1BfUklHSFQiLCJzZWFyY2hfY29udHJvbF9wb3NpdGlvbiI6IlRPUF9MRUZUIiwiem9vbV9jb250cm9sX3Bvc2l0aW9uIjoiVE9QX0xFRlQiLCJtYXBfdHlwZV9jb250cm9sX3Bvc2l0aW9uIjoiVE9QX1JJR0hUIiwibWFwX3R5cGVfY29udHJvbF9zdHlsZSI6IkhPUklaT05UQUxfQkFSIiwic3RyZWV0X3ZpZXdfY29udHJvbF9wb3NpdGlvbiI6IlRPUF9MRUZUIiwibWFwX2NvbnRyb2wiOnRydWUsIm1hcF9jb250cm9sX3NldHRpbmdzIjpmYWxzZSwibWFwX3pvb21fYWZ0ZXJfc2VhcmNoIjo2LCJ3aWR0aCI6IiIsImhlaWdodCI6IjUwMCJ9LCJwbGFjZXMiOlt7ImlkIjoiNzMiLCJ0aXRsZSI6IkZ1cmthIFBhc3MiLCJhZGRyZXNzIjoiRnVya2EgUGFzcyIsInNvdXJjZSI6Im1hbnVhbCIsImNvbnRlbnQiOiI8YSBocmVmPVwiaHR0cDpcL1wvd3d3LmJib3QuY28udWtcL3Bhc3Nlc1wvZnVya2EtcGFzc1wvXCI+PGZvbnQgY29sb3I9XCIjZmY2NjAwXCI+RnVya2EgUGFzczxcL2ZvbnQ+PFwvYT4iLCJsb2NhdGlvbiI6eyJpY29uIjoiaHR0cHM6XC9cL3d3dy5iYm90LmNvLnVrXC93cC1jb250ZW50XC9wbHVnaW5zXC93cC1nb29nbGUtbWFwLXBsdWdpblwvYXNzZXRzXC9pbWFnZXNcL2RlZmF1bHRfbWFya2VyLnBuZyIsImxhdCI6IjQ2LjU3MjQxIiwibG5nIjoiOC40MTQ4NjQiLCJjaXR5IjoiIiwic3RhdGUiOiIiLCJjb3VudHJ5IjoiIiwib25jbGlja19hY3Rpb24iOiJtYXJrZXIiLCJyZWRpcmVjdF9jdXN0b21fbGluayI6IiIsIm1hcmtlcl9pbWFnZSI6IiIsIm9wZW5fbmV3X3RhYiI6InllcyIsInBvc3RhbF9jb2RlIjoiIiwiZHJhZ2dhYmxlIjpmYWxzZSwiaW5mb3dpbmRvd19kZWZhdWx0X29wZW4iOmZhbHNlLCJhbmltYXRpb24iOiJCT1VOQ0UiLCJpbmZvd2luZG93X2Rpc2FibGUiOnRydWUsInpvb20iOjUsImV4dHJhX2ZpZWxkcyI6IiJ9LCJjYXRlZ29yaWVzIjpbXSwiY3VzdG9tX2ZpbHRlcnMiOiIifV0sInN0eWxlcyI6IiIsImxpc3RpbmciOiIiLCJtYXJrZXJfY2x1c3RlciI6IiIsIm1hcF9wcm9wZXJ0eSI6eyJtYXBfaWQiOiI0OCIsImRlYnVnX21vZGUiOmZhbHNlfX0=

Routes & Posts:

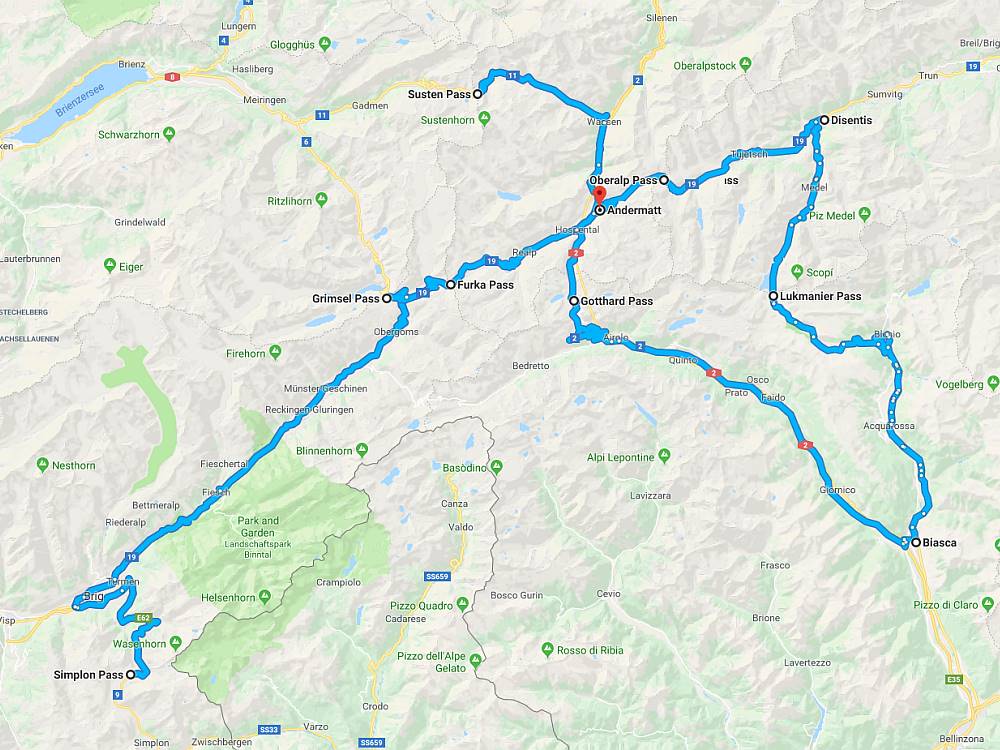
Two days in the Swiss Alps and a night in Andermatt
To Andermatt and the Saint-Gotthard Massif